Friday, March 15, 2013

Become a Lifesaver Today! Please Support Us in The 2013 Lowcountry Heart Walk


Become a lifesaver today! Please support me.


We are walking and fundraising to support the American Heart Association's Heart Walk! The 2013 Heart Walk will be held on Saturday, April 13 at Coligny Beach at 9:00 a.m. The funds we raise are needed for critical cardiovascular disease research and education.

Will you support our efforts to fight the nation's No. 1 disease killer?
By clicking on the link below, you can visit our personal fundraising page to make a secure, tax-deductible online donation. Please click "Give Now," when you visit our page. If you prefer, you can also mail a donation directly. 3 Harbour Passage, Hilton Head, SC 29926.

Here's how you can help fight heart disease:
-$25 gives 50 people educational materials that teach them how to personally reduce their risk of heart diseases and stroke.
-$50 delivers the message of healthy nutrition to elementary school students through lesson plans and activity guides.
-$100 allows one hospital to teach its patients, caregivers, and health professionals about the risks of stroke - the nation's No. 4 killer.

Heart disease and stroke impact all of us, but because of events like Heart Walk we can make a difference. Through education and research the American Heart Association is working to build healthier lives. Will you support us?

Thank you, in advance, for your donation and support!

FollowThis Link to visit our personal web page and help us in our efforts to support American Heart Association - Hilton Head, SC


The Richardson Group has been selling Hilton Head real estate and Bluffton Real Estate since 1956. Currently, our agents share 150 years of local residency, along with a deep commitment to the people and places that make the area unique. We have two different locations, one in Hilton Head and the other in Bluffton. We specialize in helping you find homes for sale inHilton Head.


Wednesday, March 13, 2013

Free Gardening Apps for Your Lowcountry Garden

Spring is upon us which means it’s time to start your garden if you haven't already. I love home grown fruits and veggies because I know there are not any harmful pesticides involved in the growing process. I always have an array of potted herbs on the porch which I use on a regular basis. Last year we started a small garden which included okra, corn, cucumbers, squash, peppers, tomatoes, and sweet potatoes. My most productive plant was my okra which is wonderful because it is one of my favorites.  This year I’m doing things on a smaller scale…smaller as in fewer varieties of plants. I definitely want to plant okra, tomatoes and squash. These seem to be what we consume most in the summer months. Now I just have to come up with a way to keep the deer out of the garden. I’m happy to share our grass with them but not the veggies.
In my garden researching, I came across a few free gardening apps. I’m working with them and trying to figure out which one works the best. I’ll keep you posted. Let me know if you have come across an app that has worked well for you.
 This gardening app provides advice on gardening tips, crops and techniques for planting.
This is a nice app that will find your location and tell you what is good to grow in your area and when to start growing. Once you pick a specific fruit or vegetable, it will tell give you planting and growing information, when to harvest and extra tips. It will also identify a problem you may be having with your crops. This one may be my favorite.
This app will help you choose which fruits and vegetables to grow.  It will give you a brief introduction to the plant, size and space needed, level of care, when to plant, and when to harvest.  It will also address some common problems. I personally wish this app had more plants in their selection.
I hope you will find this information helpful. I am relatively new to gardening so any tips you may have are welcomed.
The Richardson Group has been selling Hilton Head real estate and Bluffton Real Estate since 1956. Currently, our agents share 150 years of local residency, along with a deep commitment to the people and places that make the area unique. We have two different locations, one in Hilton Head and the other in Bluffton. We specialize in helping you find homes for sale inHilton Head.

Friday, March 8, 2013

119 Harbour Passage in Windmill Harbour ~ New Price $849,000


If expansive views of the Intracoastal Waterway are what you are looking for, please revisit 119 Harbour Passage in Windmill Harbour. Totally remodeled townhome with views all the way to Harbourtown. Updated kitchen with granite counter tops, stainless appliances, bar area, and glass front cabinets. Open floor plan with access to rear 2 tier trex deck. Hardwood flooring and custom moulding throughout the downstairs. Large master suite with fireplace and wonderful water views. 3 stop elevator and heated and cooled workshop in the 3 car garage are just a few of the extras. Professionally landscaped with tabby driveway make for wonderful curb appeal.
Joe Lucchesi
Windmill Harbour Real Estate
(843)384-6183 cell
(843)681-5600 office
ndlucchesi@aol.com


The Richardson Group has been selling Hilton Head real estate and Bluffton Real Estate since 1956. Currently, our agents share 150 years of local residency, along with a deep commitment to the people and places that make the area unique. We have two different locations, one in Hilton Head and the other in Bluffton. We specialize in helping you find homes for sale inHilton Head.

Tie-Dyed Easter Eggs ~ Hilton Head Island

I can't wait to try this out. I love thrifting and usually find some pretty amazing treasures. I would say that I frequent our local Hilton Head and Bluffton thrift stores at least three times a week. That's a lot for me since I have a full time job and a family! Some of my best finds have been never worn designer clothes, big name belts - I found a brand new $120 retail belt for $1, great outdoor furniture, a ping pong table for $10, tons of fun serving pieces, and a great chandelier.

Now I will be on a mission to find fun printed ties for this Easter Egg craft listed below.  Make sure to read some of the comments at the bottom of Relish's blog. Looks like they give you some needed tips like which type of pot to use, extending the cooking time, and spraying with enamel once you have colored the eggs.

Idea and directions found on relish.com. Let me know how yours turn out. Good Luck!

How to Dye Easter Eggs with Silk Ties

"Tie-dye" eggs with your kids this Easter and create intricately beautiful patterns in just a few simple steps.
tye die eggs in pink basket_WEB
High Cotton Food Styling & Photography
Eggs’ delicate white shells beg to be dressed in vibrant colors and printed with patterns on Easter weekend. Though we love traditional dyes, there are other fun and easy ways to make your eggs elegant. Our favorite is the simple yet show-stopping silk-tie transfer method. Courtesy of Relish contributing photographer Karry W. Hosford, here is how to create the fun “tie-dyed” designs:
What You’ll Need:
  • Eggs
  • 100% Silk ties (pick up a collection at your local thrift store rather than from your closet)
  • Scissors
  • 2 Tbs Vinegar
  • Water
  • Enamel pot
  • Towel
Instructions:
Disassemble tie_WEB
Disassemble a tie by cutting the fine threads that hold it together and then separating the inner wool from it.
cut apsrt tie_WEB
Cut the tie silk in 5x7ish sections, think of rolling the egg like candy in a wrapper.
Wrap the egg up_WEB
Place the cut tie fabric with the outer side facing you. (The visible part of the tie must touch the egg.)
twist like candy_WEB
Roll the skinny part of the egg across the 5inch part, overlapping any fabric, then twisting the ends to tighten like you are wrapping candy.
Wrap with Tie inner_WEB
When the ends are tight, hold them both with one hand, and with the other wrap the wool from the inside of the tie around it. Wrap the wool completely around the egg, like you are making a ball of yarn. Ideally you will cover all the egg bits, but if some is left exposed don’t worry—it will just create a design accented by white areas. Use more than one tie inner if necessary.
All wrapped and rubber banded_WEB
Once the egg is completely wrapped, secure it with rubber bands.
Boil for ten min_WEB
Place it in a pot of boiling water with 2 tablespoons of vinegar. Boil for ten minutes, making sure that they are all covered with the water.
remove and let cool_WEB
Remove from water and let cool.
start unwrapping_WEB
When cool to the touch, remove bands and wrapping, and then the silk wrapping. Place on towel to dry.
finished egg_WEB


Read more: http://relish.com/articles/how-to-dye-eggs-with-silk-ties/#ixzz2My2TQ0Lj

Tuesday, March 5, 2013

Enhancing Your Home's Curb Appeal on Hilton Head Island

With so many homes on the market these days, buyers are reluctant to even get out of their car if they don’t find your home’s curb appeal inviting. Since this is the first thing a buyer will see, it is so important to address this critical first view of your home.  Try boosting your curb appeal with some of these tips.
 
Review your home’s current condition and curb appeal.
1. View your home from several areas – across the street, side views, and rear views.
2. Walk up to your home and pay attention to areas that might need a little TLC. Keep these things in mind upon approaching your house. Does it need to be power washed? Is the paint in good condition? Are there areas that might need to be repaired (ex. wood rot)? Is your walkway level and inviting? Does your landscaping need to be spruced up or trimmed?
3. What are your home’s most attractive features and how can you showcase those areas?

Start enhancing the curb appeal.
Once you’ve addresses any problem areas on the exterior, it’s time to move on to enhancing your home’s appeal. Simple and inexpensive enhancements can make a world of difference.
1. Add potted flowers at your stairs or near your front door.
2. Consider purchasing a new exterior address number.
3. Remove window screens and make sure windows are perfectly clean.
4. Consider a new welcome mat at the front door.
5. Consider walkway lighting or landscape lighting.
6. Make sure your front door is clean and freshly painted if needed.
7. If you have a large front porch, create a small sitting space. Every porch looks great with a few rocking chairs.

Since most buyers see a home for the first time on the Internet, pictures are very important and can increase your chances of a sale. Here are some tips on helping your realtor create that great exterior shot.
1. Make sure cars and toys are removed before the shoot.
2. Have your lawn cut and edged.
3. Make sure your lawn, driveway, and walkways are blown and free of debris.
4. Take several shots from different angles.
5. Review the light at different times of the day. Keep track of the optimal time where the sunlight showcases your home best.
Here are some inspirations for enhancing your curb appeal.

Clean and simple front porch.

Perfect color for any buyer.

Beautifully maintained landscaping. Simple and elegant.
 

Traditional Lowcountry home.
 
Great exterior lighting.
 
Another great Lowcountry cottage.
 
Love this Lowcountry porch! The finished ceiling is a beautiful touch.
 
 
The Richardson Group has been selling Hilton Head real estate and Bluffton Real Estate since 1956. Currently, our agents share 150 years of local residency, along with a deep commitment to the people and places that make the area unique. We have two different locations, one in Hilton Head and the other in Bluffton. We specialize in helping you find homes for sale inHilton Head.


Monday, March 4, 2013

Weekend Getaway ~ Hilton Head Island to Greenville, SC


Source
This past weekend, we took a family vacation to Greenville, SC.  This was my first Greenville experience and I have to say I loved it. What a quaint town! We stayed right on Main Street so we were able to walk everywhere. Most of our time was spent downtown and in the West End area. There were tons of restaurant choices that were kid friendly and SO yummy. As you would expect in a downtown area, the shopping was also good. We enjoyed exploring the streets and parks. We spent a lot of time at Falls Park on the Reedy. Located in the Historic West End, this park is a nature lover’s paradise. We followed the Swamp Rabbit Trail (kids loved the name) along the Reedy River taking in the waterfalls and the beautiful scenery.
As a special treat for the boys, we had dessert on Saturday night at The Chocolate Moose right on Main Street. The kids had seen and talked about this place all day long so it was a highlight of the night. The boys choose chocolate mousse but this was not your ordinary chocolate mousse. Their mousse was a chocolate cupcake crumb bottom followed by a rich chocolate mousse, whipped cream topping and of course sprinkles. They devoured it in a matter of minutes! I decided to go for a cupcake.  Their everyday flavors included black and white, chocolate, red velvet, vanilla, and vanilla with chocolate. Saturday night’s specialty flavors were carrot, chocolate tuxedo, lemon, and salted caramel chocolate. I have to say, they all looked amazing but I was craving the sweet and salty mix on Saturday. So I went for the salted caramel chocolate cupcake. I chose wisely!! This was the best cupcake I’ve ever had…ever. I’m still dreaming about it on Monday morning. So if you are ever in the Greenville area, add The Chocolate Moose to your list. You won’t be sorry.


Red Velvet Cupcake
 
So now I’m on a mission to try to recreate this cupcake. I’m not a baker by any means but I’m going to give it a try. Thanks to Pinterest, I’ve found a couple recipes and some great pictures to drool over. Here are a few.
This one is called Chocolate “Wacky Cake” Cupcakes with Salted Caramel Buttercream.

Chocolate “Wacky Cake” Cupcakes  From A Farm Girl’s Dabbles
3 c. all-purpose flour
6 T. cocoa
 1 tsp. salt
 2 c. sugar
 2 tsp. baking soda
 2/3 c. salad oil
 2 T. vinegar
 2 c. cold water
 2 tsp. vanilla
 
Preheat oven to 350°.
Prepare 2 regular cupcake pans (24 cupcakes). You can use paper cupcake liners or just spray the cupcake wells with cooking spray.
Measure all dry ingredients into bowl and whisk to combine. Make 3 large holes in the dry ingredients. In a separate bowl, combine salad oil and vinegar. Pour this into the 3 holes. Pour the water over entire mixture. Mix with a fork. Add vanilla and stir. Divide evenly into the 24 cupcake wells. Bake for 25 to 30 minutes, removing from the oven as soon as a toothpick comes out clean.  This can also be made in a 9 x 13 cake pan – bake for approximately 35 minutes.
Yield:  24 cupcakes (or a 9 x 13 pan)
Source:  Mom’s recipe box
Salted Caramel Buttercream
For the caramel:
1 cup sugar
4 tablespoons water
1/2 cup heavy cream
pinch sea salt
Add the sugar to a small saucepan and pour the water over it. With the heat on low, swirl the pan around until the sugar has nearly dissolved. Be careful not to let it boil. If it starts getting too hot, remove it from the burner for a few seconds, while continuing to swirl.
Once the sugar has mostly dissolved, raise the heat to medium-high and bring the mixture to a boil. Cover it immediately and let it boil for 2 minutes.
Uncover and continue swirling the mixture until it becomes dark amber. Be VERY careful here. You want it to be dark, but it can go from dark to burning in seconds. Once it goes from golden amber to dark amber, take it off the heat immediately.
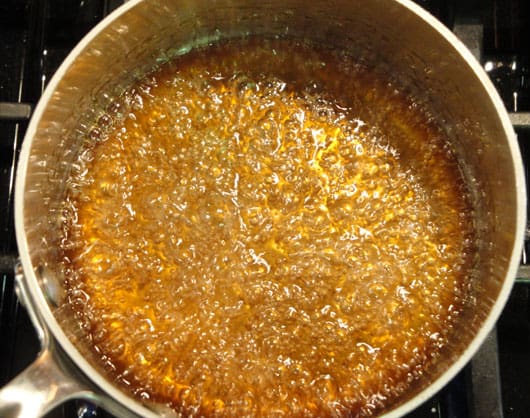
 
This is what the sugar and water mixture looks like when it first starts to boil.
Now it’s turning golden.

Very near the dark amber stage, be prepared to get it off the heat FAST!

Slowly pour in the cream, stirring with a whisk. Be careful, as the caramel will start splattering if you pour too fast. Whisk until combined and set aside. Let caramel cool to room temperature.
For the buttercream:
6 egg whites
1/2 cup granulated sugar
1/4 teaspoon cream of tartar
4 sticks of butter, at room temperature
To finish the cupcakes:
your favorite bottled caramel sauce
flakey sea salt
Combine the egg whites, sugar, and cream of tartar in the stainless steel bowl of an electric mixer (i.e. your KitchenAid bowl). Bring a large pan of water to simmer on the stove, making sure that when you place your mixer bowl into it, that the bottom of it is sitting in the water a bit. Set the mixer bowl in the pan of simmering water and whisk constantly until the mixture is extremely foamy and reaches 140 degrees on an instant-read thermometer. Be really careful not to curdle the egg whites. If it feels like that’s happening, just remove the mixer bowl for a bit.
Remove the bowl to your stand mixer and beat on high speed for 3-5 minutes, until the meringue mixture holds glossy, marshmallowy peaks. Remove the meringue to another bowl and place the empty mixer bowl back on the stand mixer. Add half the butter and one-third of the meringue to the mixer bowl and beat until well combined. Continue to add the remaining two-thirds of the meringue a dollop at a time. The mixture may look curdled at this point, which is a bit alarming after going through all this work, but adding the remaining butter a tablespoon at a time will smooth things out. It really does come together at the end.
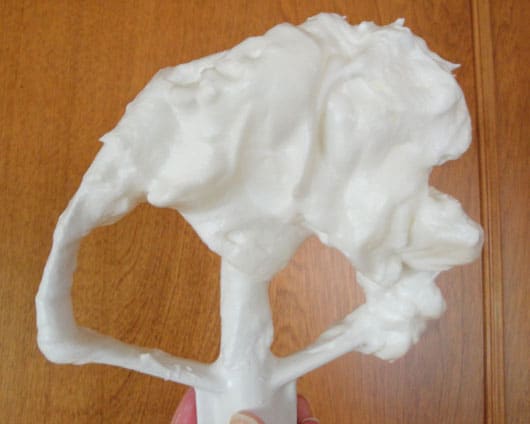
This is what your meringue should look like.

With the mixer on low, add the room-temperature caramel and mix until well-combined. Do not add warm/hot caramel, as it will melt the butter!
Top your cupcakes with the buttercream, drizzle on your favorite bottled caramel sauce, and sprinkle with some flakey sea salt to finish them off.
Yield: enough to put a large mound of buttercream on each of 24 cupcakes
Source: crispy waffle
 
The Perfect Chocolate Cupcake with Salted Buttercream From Chef in Training
 
Ingredients
 •1/2 cup unsweetened cocoa sifted
•1 cup hot water
•1 cup buttermilk
•2 cups sugar
•2 eggs
•1/2 cup vegetable oil
•1 1/2 tsp. vanilla
•2 1/2 cups flour
•2 tsp. baking powder
•1 tsp. baking soda
•1/2 tsp. salt
•1/2 cup heavy cream
 SALTED CARAMEL BUTTERCREAM. .
•1/4 cup sugar
•2 Tbsp. water
•1/4 cup heavy cream
•1 tsp. vanilla
•1/2 cup butter softened
•1/2 tsp. sea salt
•1 package Dream Whip dry
•3 cups powdered sugar more if needed to reach desired consistency
Instructions
1.Add the sifted cocoa powder to a medium sized bowl and pour in the cup of hot liquid. Whisk until completely dissolved.
 
2.Next add the buttermilk to cool down the mixture, then add the sugar and whisk until all is combined.
 
3.Add the eggs, oil and vanilla and mix again.
 
4.In a small bowl, stir flour, baking powder, baking soda and salt. Whisk this into the wet mixture until you no longer see any lumps.
 
5.Stir in heavy cream until evenly mixed in.
 
6.Pour into cupcake tins and bake at 350 degrees F for 18-22 minutes or until done. Let cool and chill in fridge for at least 30 minutes.
 
7.TO MAKE SALTED CARAMEL BUTTERCREAM: In a saucepan, stir together granulated sugar and water. Bring to a boil over medium high heat. Cook without stirring until mixture turns a deep amber color, about 10 minutes. Remove from heat and slowly add in cream and vanilla, stirring until very smooth. Let caramel cool for about 20 minutes, until it is just barely warm and still pourable. Alternatively, you could use just under 1/2 cup of your favorite caramel sauce.
 
8.Beat butter and salt together until lightened and fluffy. Reduce speed to low and add dry Dream Whip until combined. Next beat in powdered sugar. Mix until thoroughly combined. Scrape down the side of the bowl and add the caramel. Beat on medium high speed until light and airy, and completely mixed (about 2 minutes). Mixture should be ready to use without refrigeration. If your caramel was too hot when added, it will cause your icing to be runny. If this happens refrigerate for 15-20 minutes. Once cupcakes have cooled, frost onto cupcakes.
 Enjoy!
(Cupcake recipe adapted from: Good Food Gourmet)
(Salted Caramel Frosting recipe adapted from: Made in Melissa’s Kitchen)
 
Yet another variation…
 
Dark Chocolate Cupcakes with Salted Caramel Buttercream From The Cake Merchant
 
Yield: 12 Cupcakes
Ingredients
Dark Chocolate Cupcakes
8 tablespoons unsalted butter, cut into 4 pieces
2 ounces bittersweet chocolate, finely chopped
1/2 cup Dutch-processed cocoa
3/4 cup all-purpose flour
1/2 teaspoon baking soda
3/4 teaspoon baking powder
2 large eggs
3/4 cup sugar
1 teaspoon vanilla extract
1/2 teaspoon salt
1/2 cup sour cream or greek yogurt
Salted Caramel Buttercream
1 cup (2 sticks) butter
1/2 cup salted caramel sauce
2-3 cups powdered sugar
1 teaspoon vanilla extract
Instructions For the cupcakes:
1.Preheat the oven to 350 degrees. Line a cupcake pan with 12 paper liners.
2.In a double boiler, melt the chocolate, butter, and cocoa powder. You can also do this in the microwave on 50% power for 30 second intervals, stirring after each interval. Set the mixture aside to cool, or keep it in the refrigerator until it is just barely warm.
 3.In a small bowl, whisk together the flour, baking soda, and baking powder. In a separate bowl, whisk together the eggs, sugar, and vanilla. Add the cooled chocolate mixture and whisk together until combined.
 4.Add 1/3 of the flour mixture and whisk. Add the sour cream and whisk to combine. Add the remaining flour mixture, and whisk gently until it is fully incorporated.
 5.Divide the batter between the 12 cupcake liners. I used a cookie scoop to do this. Bake for 18-20 minutes, until a toothpick inserted into the center comes out clean. Cool completely on wire racks before frosting.
 
For the frosting:
6.Make the caramel sauce and cool to room temperature.
7.In an electric mixer, beat the butter on medium high, speed until light and fluffy, about 3 minutes. Gradually add in the caramel sauce.
 8.Put the mixer on low and add the powdered sugar and vanilla. Increase the speed to medium and beat until fully incorporated. Pipe the frosting onto the cooled cupcakes and drizzle with additional caramel sauce if you wish.
 
Note: This recipe makes enough to pipe large swirls of frosting on your cupcakes. If you are spreading the frosting, you may want to make half of the original recipe.
 Cupcake recipe adapted from Cook’s Illustrated via Tracy’s Culinary Adventures
 
I'll need this too! Here's the cupcake icing tutorial from Decorate This. Click on the picture for the link.
 
The Richardson Group has been selling Hilton Head real estate and Bluffton Real Estate since 1956. Currently, our agents share 150 years of local residency, along with a deep commitment to the people and places that make the area unique. We have two different locations, one in Hilton Head and the other in Bluffton. We specialize in helping you find homes for sale inHilton Head.